Docs Demo

Introduction to iVMega Pro Premium Blogger Template
iVMega Pro premium blogger template is an highly responsive and friendly blogger template designed to comply with modern SEO techiques such that Google, Bing and other popular search engines may rank your blog high when iVMega Pro blogger template is in use.
iVMega Pro is super fast, mobile friendly and optimized for both Google AdSense and search engines so that you can make more money from AdSense and also gain more traffic to your blogger blog while using iVMega Pro premium blogger template.
Using iVMega Pro premium blogger template, you can also accept donations and process payments from PayPal and various card users directly from your blogger blog.
NOTE:
To get the best performance in cross-browser compatibility, the best in speed and to comply with the best modern SEO practices, we keep the use of un-necessary scripts to the minimal level in our blogger templates; ensuring that we use scripts only when we must.
Helping you gain maximum traffic to your blogger blog is our number 1 goal after all!
-
Download Now (free version)
No supports included. Learn more about our free template versions
or Buy Premium -
Installation Guides: iVMega Pro Premium Blogger Template
1. The Pre-requisite:
Before you install or upload the iVMega Pro Premium blogger template on your blogger blog, it is recommended that you complete setting up the template as illustrated from below:
- Secure iVMega Pro Premium Blogger Template - go to the iVMega Pro Premium Blogger template page and purchase the theme.
- Receive the access link to download the template - wait until your access link or download link for the template files arrive your inbox.
- Download the template xml file - now, when the access link arrives, download the attached or uploaded file on your PC, smartphone or whichever device was used.
- Unzip the template compressed file - the file is compressed in a .rar or .7zip file format. Simply decompress the downloaded file using 7zip or WinRAR.
- Open iVMega Pro XML file - finally, locate the iVMega Pro Premium Blogger Theme vX.XX.xml in the decompressed folder and open it using your favourite text editor.
NOTE:
For Android Users: Acode is recommended. For Windows, Linux and Mac users: NotePAD++ is recommended.
You can download Acode from Google Play Store for free.
Once you are there; you may now follow the step by step guides from below to configure and setup the iVMega Pro Premium Blogger template.
NOTE: THIS WHOLE PROCESSES CAN BE DONE USING JUST YOUR SMARTPHONE
Step 1.0: Upload Your Blog Logo:
In the iVMega Pro Premium Blogger Template, you can optionally display both your blog logo and blog name elegantly.
Your blog logo is the image that appears next to your blog name. Uploading your blog logo adds more beauty to your blog and further enhances it.
To Upload your Blog Logo:
- I assume you are already logged into your blogger blog.
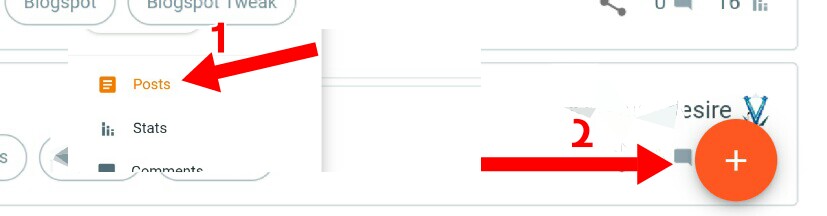
- Click Post from the blogger main menu (to your left) then click the plus icon as seen in the image below. Clicking that will open a new post editor.
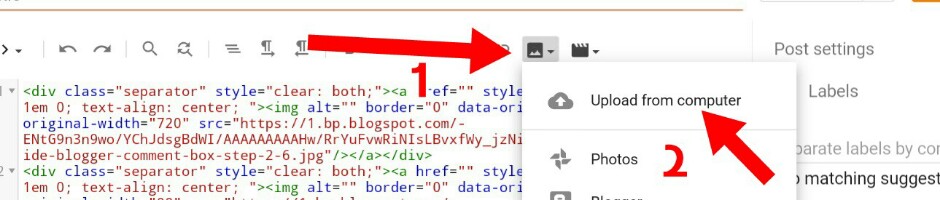
- Next, click the image upload icon as seen in the image below. Clicking that will pop out an upload wizard that allows you upload an image on blogger.
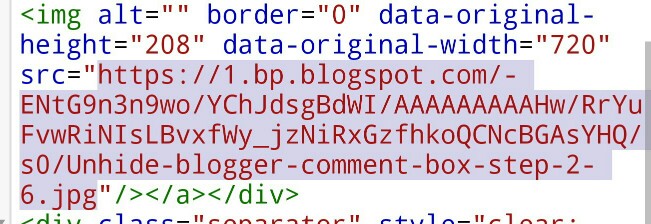
- Using the upload wizard above, upload your blog logo and copy the image link as seen from the image below.
- Now, on your text editor where you already have the iVMega Pro template .xml file opened, search for:
- Now, replace the blog image logo link in step 5 above with blog logo image link you copied from the step 4. See the image below.
<!-- header-logo -->

NOTE:
- If you choose to, you may also upload your blog logo on another image upload server. But to make your blog load really faster, it is recommended that you use blogger.
- Regardless of the resolution of your blog logo, the image is automatically resized to 35px by 35px. Therefore, I recommend that you use an image of 60px by 60px resolution at maximum.
Step 1.1: Modify Main Navigation Menu
The primary or Main Navigation Menu allows both your blog readers, visitors and search engine spiders easily browse and navigate your blog.
As a result, the Main Navigation Menu should contain all the important links you want your blog visitors and search engine spiders see.
To Modify your Blog Main Navigation Menu:
- From your text editor where you already have the iVMega Pro template .xml file opened, search for:
- Once there, modify the links as needed and as you want.
- That space can contain unlimited number of links. You can add to, remove from or modify the existing links there.
<!-- Main Navigation Menu -->
NOTE:
- You can have as many links as you want inserted or included in the list. It would be perfectly contained.
- If you need to change the icon next to any link therein, you can simply replace the fa-car (for example) with say, fa-basket; if that's suitable for you.
- For a complete list of icons, you can check with fontawesome icons bootstrap cheat sheets page here.
Step 1.1b: Modify Static Pages Main Navigation Menu
For improved customization and flexibility, we made iVMega Pro Premium blogger template in such a way that a slightly different and separate Navigation Menu is displayed when your blog's Static pages are being viewed.
So, instead of the primary or Main Navigation Menu for all other pages, the static pages specific navigation menu is displayed.
To Modify your Blog static Pages Navigation Menu:
- From your text editor where you already have the iVMega Pro template .xml file opened, search for:
- Once there, modify the links as needed and as you want.
- That space can contain unlimited number of links. You can as well add to, remove from or modify the existing links therein.
<!-- Static Page Navigation Menu -->
NOTE:
- Though it is recommended that you keep the links here to a minimal number, you can have as many links as you want inserted or included in the list. It would be perfectly contained.
- Likewise, if you need to change the icon next to any link therein, you can simply replace the fa-basket (for example) with say, fa-car; if that's suitable for you.
Step 1.2: Modify your Blog Social Follow Buttons

Using the Social Buttons, you can point your blog readers to your social media channels such as Facebook Page, Twitter Page, YouTube, Instagram, Telegram etc.
For maximum exposure, we secure a place for your social buttons right below the Navigation Menu on all pages including static pages.
The default social buttons link to iVTemplates's social channels.
You should modify the links to your own.
To Modify your Blog's Social Buttons:
- From your text editor where you already have the iVMega Pro template .xml file opened, search for:
- You'll find two (2) instances of that line, replace the links that follow each instance of that line accordingly. See the image below:
<!-- Follow Buttons -->

NOTE:
- You can add to the links or remove from the links.
- Only Telegram, Twitter, Facebook, Whatsapp, Instagram, YouTube, LinkedIn and Pinterest are supported.
Step 1.3: Modify Secondary Menu Links

The secondary menu links, as the name implies; only complements the the Main Navigation Menu.
You should modify it to suit your taste.
To Modify the Secondary Menu Links
- From your text editor where you already have the iVMega Pro template .xml file opened, search for:
- Change the links there to the ones you want.
<!-- secondary menu links -->
NOTE:
- You can only have two (2) links in the secondary menu links section.
- If you wish to change icons behind the links to suit your need, check for icons at the fontawesome icons bootstrap cheat sheets page linked here
Step 1.4: Modify Featured Posts Feed Section
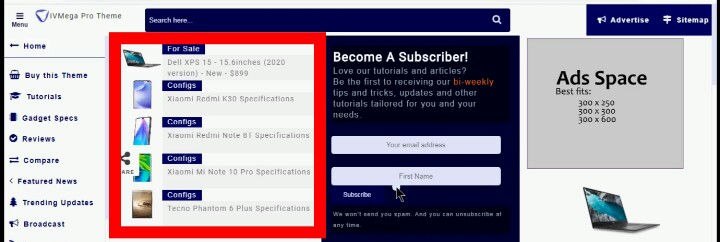
By default, the featured articles section displays your blog's most recent posts but you can change that per your needs.
To Modify the Featured Posts:
- From your text editor where you already have the iVMega Pro template .xml file opened, search for:
- As earlier mentioned, by default the Featured Posts Feed displays your blog's most recent published posts.
- If you wish to change this such that the Featured Posts Feed section displays most recent posts tagged under certain label or category, simply replace the link highlighted in the image below:
- Replace the link in the image above with this:
- REMEMBER: replace SEO with the label-name whose posts you want shown in the Featured Posts Feed section.
<!-- Featured Post Feed -->
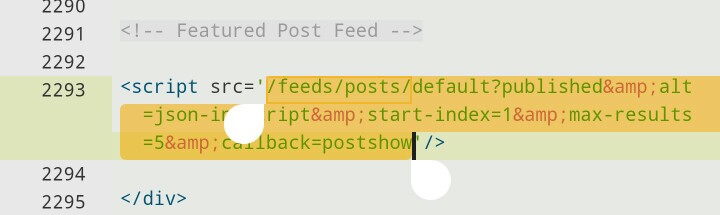
/feeds/posts/summary/-/SEO?published&alt=json-in-script&callback=showrecentposts&start-index=1&max-results=5
NOTE:
- Maximum number of posts to be shown is five (5).
- The label-name is case-sensitive. Thus; SEO is not the same as Seo or seo. Therefore, you should enter the label-name as it appears.
Step 1.5: Modify Main Subscribers Optin Widget
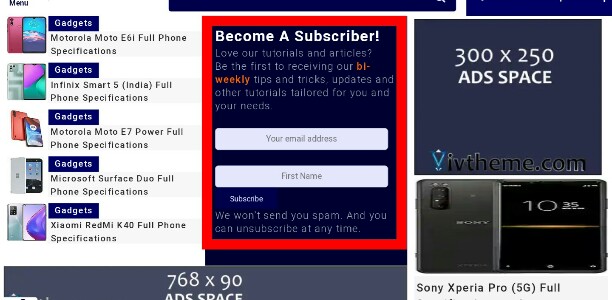
The Main Subscribers Optin Widget section is only visible on the homepage and it allows your subscribers subscribe to your blog using their e-mail addresses.
By default, the subscriptions and mailing list is being managed by FeedBurner. ConvertKit and MailChimp are also supported.
To Modify Main Subscribers Optin Widget
- From your text editor where you already have the iVMega Pro template .xml file opened, search for:
- In the code snippets highlighted as seen in the image above, replace the two (2) instances of iVTemplates in the code snippets with your FeedBurner's feed URI. Don't know your FeedBurner URI? Learn how to locate your FeedBurner Feed URI here
<!-- Main Subscribers Optin Widget -->
NOTE:
If you would like to use either ConvertKit or MailChimp instead of FeedBurner, see the tutorials below:
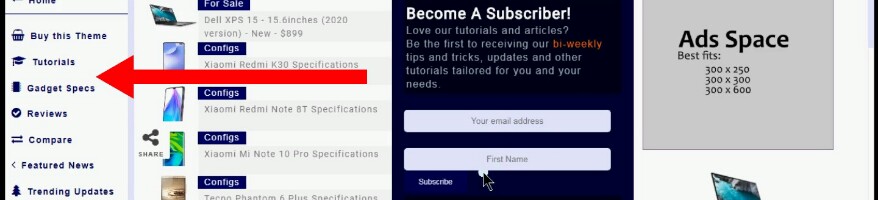
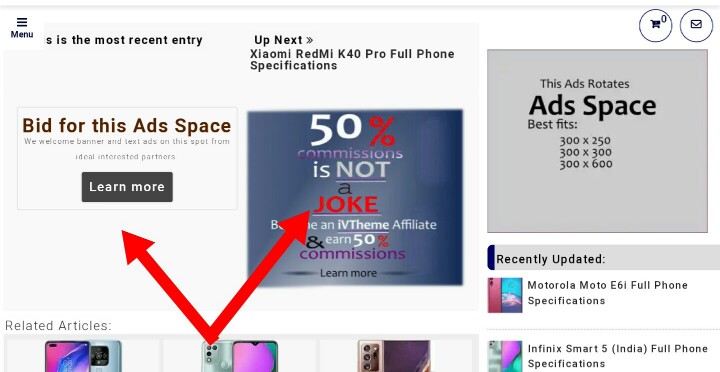
Step 1.6: Modify SideBar Random Ads
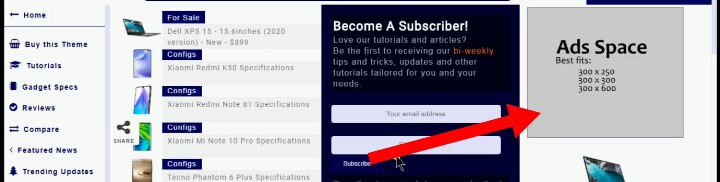
The Sidebar Random Ads is a 300px by 250px ads space that allows you display both image (banner) and text ads on your blog sidebar.
These adverts are randomly displayed on every page-load. Thus, when banner 1 is being displayed now, refresh the page and the banner 2 or banner 3 would be displayed.
In this ads space, you can have as many adverts (including Google AdSense, affiliate banners and links) as you want.
To Modify the Sidebar Random Ads:
Option 1: to use Google AdSense in the Sidebar Random Ads Space
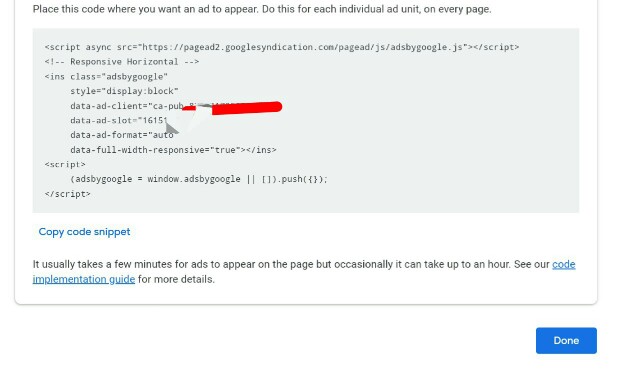
- Obtain the AdsCode snippets for the Ads unit you want displayed on that space from your Google AdSense account.
- From your text editor where you already have the iVMega Pro template .xml file opened, search for:
- Just below it, locate the line of codes highlighted in the image below.
- Paste the Google AdSense AdsCode snippets you copied from step 1 here so that it replaces the line of codes highlighted in the image above.
- Done.
<!-- sidebar random ads-1 -->
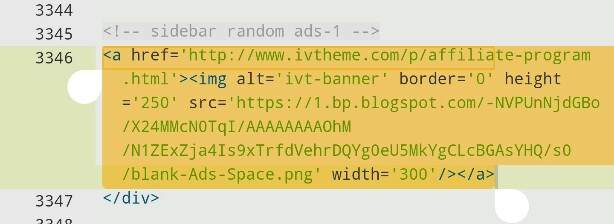
Option 2: to use images of your own as Ads in the Sidebar Random Ads Space
- From your text editor where you already have the iVMega Pro template .xml file opened, search for:
- Now, go to Posts and click the plus icon as seen in the image below. Clicking that will open a new post editor.
- Next, click the image upload icon as seen in the image below. Clicking that will pop out an upload wizard that allows you upload an image on blogger.
- Using the upload wizard above, upload the image you want to use for the banner ads and copy the image link as seen from the image below.
- Now, go back to the text editor and replace the Banner image url you earlier copied from above with the existing banner image url.
- Again, replace link (url) seen in the image below with the link (url) you want your image banner point or linked to.
- Repeat the same procedures with all the banner ads you want displayed there.
- Done.
<!-- sidebar random ads-1 -->


Step 1.7: Modify SideBar Dynamic Ads
The Sidebar Dynamic Ads is a 300px by 250px ads space that allows you display both image (banner) and text ads on your blog sidebar similar to the sidebar random ads.
These adverts are auto-rotated on your sidebar and moves with users's page-scroll (except on mobile views). Thus, it sticks to your blog sidebar.
In this ads space, you can have as many adverts (including Google AdSense, affiliate banners and links) as you want.
To Modify the Sidebar Dynamic Ads:
Option 1: to use Google AdSense in the Sidebar Dynamic Ads Space
- Obtain the AdsCode snippets for the Ads unit you want displayed on that space from your Google AdSense account.
- From your text editor where you already have the iVMega Pro template .xml file opened, search for:
- Just below it, locate the line of codes highlighted in the image below.
- Paste the Google AdSense AdsCode snippets you copied from step 1 here so that it replaces the line of codes highlighted in the image above.
- Done.
<!-- Sidebar Dynamic Ads-1 -->
Option 2: to use images of your own as Ads in the Sidebar Dynamic Ads Space
- From your text editor where you already have the iVMega Pro template .xml file opened, search for:
- Now, go to Posts and click the plus icon as seen in the image below. Clicking that will open a new post editor.
- Next, click the image upload icon as seen in the image below. Clicking that will pop out an upload wizard that allows you upload an image on blogger.
- Using the upload wizard above, upload the image you want to use for the banner ads and copy the image link as seen from the image below.
- Now, go back to the text editor and replace the Banner image url you earlier copied from above with the existing banner image url.
- Again, replace link (url) seen in the image below with the link (url) you want your image banner point or linked to.
- Repeat the same procedures with all the banner ads you want displayed there.
- Done.
<!-- Sidebar Dynamic Ads-1 -->
Step 1.8: Modify Ads Below Post Title
The Ads Below Post Title AdsSpace is a spot below your blog posts title and just before your posts content.
Within this space, you can contain all kinds of ads and of any sizes. Any content put within that space is center-aligned - this is done to ensure that such content grabs maximum attention.
To Modify the Ads Below Posts Title:
Option 1: to use Google AdSense in the Ads Below Posts Title Space
- Obtain the AdsCode snippets for the Ads unit you want displayed on that space from your Google AdSense account.
- From your text editor where you already have the iVMega Pro template .xml file opened, search for:
- Just below it, locate the line of codes highlighted in the image below.
- Paste the Google AdSense AdsCode snippets you copied from step 1 here so that it replaces the line of codes highlighted in the image above.
- Done.
<!-- Ads Below Posts Title -->
Option 2: to use images of your own as Ads in the Ads Below Posts Title Space
- From your text editor where you already have the iVMega Pro template .xml file opened, search for:
- Now, go to Posts and click the plus icon as seen in the image below. Clicking that will open a new post editor.
- Next, click the image upload icon as seen in the image below. Clicking that will pop out an upload wizard that allows you upload an image on blogger.
- Using the upload wizard above, upload the image you want to use for the banner ads and copy the image link as seen from the image below.
- Now, go back to the text editor and replace the Banner image url you earlier copied from above with the existing banner image url.
- Again, replace link (url) seen in the image below with the link (url) you want your image banner point or linked to.
- Repeat the same procedures with all the banner ads you want displayed there.
- Done.
<!-- Ads Below Posts Title -->
Step 1.9: Modify Ads Below Blog Pager
The Ads Below Blog Pager AdsSpace is a spot below your blog posts content and just before your posts comments.
At this spot, we make available two spaces for adverts.
Within this spaces, you can contain all kinds of ads of 300px by 250px resolution (size). Any content put within that space is center-aligned - this is done to ensure that such content grabs maximum attention.
To Modify the Ads Below Blog Pager:
Option 1: to use Google AdSense in the Ads Below Blog Pager
- Obtain the AdsCode snippets for the Ads unit you want displayed on that space from your Google AdSense account.
- From your text editor where you already have the iVMega Pro template .xml file opened, search for:
- You'll find two (2) instances of that line. Just below it, locate the line of codes highlighted in the image below.
- Paste the Google AdSense AdsCode snippets you copied from step 1 here so that it replaces the line of codes highlighted in the image above.
- Done.
<!-- Ads Below Blog Pager -->
Option 2: to use images of your own as Ads in the Ads Below Blog Pager Space
- From your text editor where you already have the iVMega Pro template .xml file opened, search for:
- You'll find two (2) instances of that line. Now, go to Posts and click the plus icon as seen in the image below. Clicking that will open a new post editor.
- Next, click the image upload icon as seen in the image below. Clicking that will pop out an upload wizard that allows you upload an image on blogger.
- Using the upload wizard above, upload the image you want to use for the banner ads and copy the image link as seen from the image below.
- Now, go back to the text editor and replace the Banner image url you earlier copied from above with the existing banner image url.
- Again, replace link (url) seen in the image below with the link (url) you want your image banner point or linked to.
- Repeat the same procedures with all the banner ads you want displayed there.
- Done.
<!-- Ads Below Blog Pager -->
Step 1.10: Modify Pre-Footer Subscribers Optin Widget
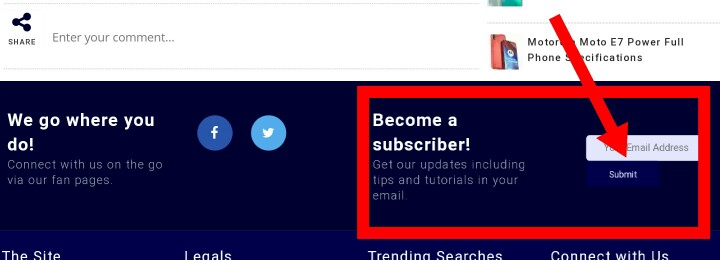
The Pre-Footer Subscribers Optin Widget section is only visible on posts pages and it allows your subscribers subscribe to your blog using their e-mail addresses.
By default, the subscriptions and mailing list is being managed by FeedBurner. ConvertKit and MailChimp are also supported.
To Modify the Pre-Footer Subscribers Optin Widget
- From your text editor where you already have the iVMega Pro template .xml file opened, search for:
- In the code snippets, replace the two (2) instances of ivtemplates in the code snippets with your FeedBurner's feed URI. Don't know your FeedBurner URI? Learn how to locate your FeedBurner URI here
<!-- Pre-Footer Subscribers Optin Widget -->
NOTE:
If you would like to use either ConvertKit or MailChimp instead of FeedBurner, see the tutorials below:
Step 1.11: Modify Pre-Footer Social Follow Buttons
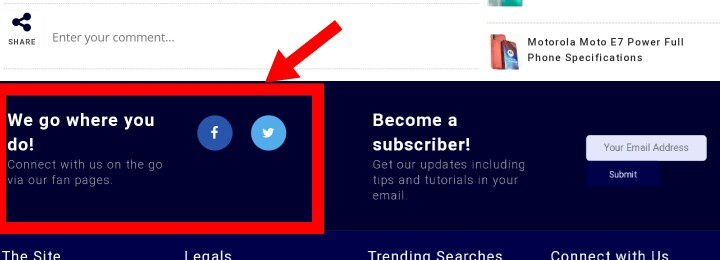
The Pre-Footer Social Follow Buttons allows you add a few more social buttons to your blog. Using the Social Buttons, you can point your blog readers to your social media channels such as Facebook Page, Twitter Page, YouTube, Instagram, Telegram etc.
For the best fit, it is recommended that you only keep maximum of two (2) buttons here.
The default social buttons link to iVTemplates's social channels.
You should modify the links to your own.
To Modify the Pre-Footer Social Buttons:
- From your text editor where you already have the iVMega Pro template .xml file opened, search for:
- Replace the links in the line accordingly. See the image below:
<!-- Pre-Footer Follow Buttons -->
NOTE:
- Only Telegram, Twitter, Facebook, Whatsapp, Instagram, YouTube, LinkedIn and Pinterest are supported.
Step 2.0: Install iVMega Pro Blogger Template on your Blogger Blog
Now that you are done with setting up your iVMega Pro Blogger Template, the next step is to install the template on your blogger blog.
The installation process for iVMega Pro Blogger template is the same as every blogger template. Hence, you can just use the same method of installing other template for iVMega Pro Blogger Template on your blogger blog.
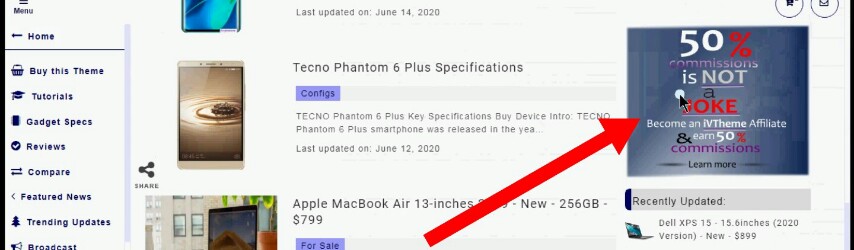
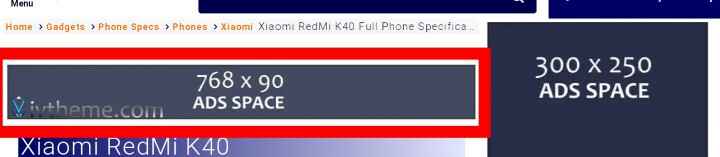
Step 2.1: Modify Main Ads Banner
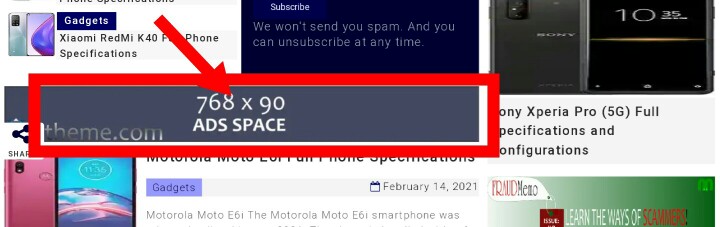
After installing the iVMega Pro Blogger Template on your Blogger blog, you may now setup or modify the iVMega Pro Blogger template's Main ads banner.
The main ads banner is displayed on homepage and index pages (i.e archive, search and label pages)
The main ads banner widget can contain and display all kinds of adverts including text, video and image ads both from Google AdSense and the ones created by yourself.
To Modify the Main Ads Banner:
Option 1: to use Google AdSense
- Obtain the AdsCode snippets for the Ads unit you want displayed on that space from your Google AdSense account.
- Login your Blogger blog account if you are not logged-on already.
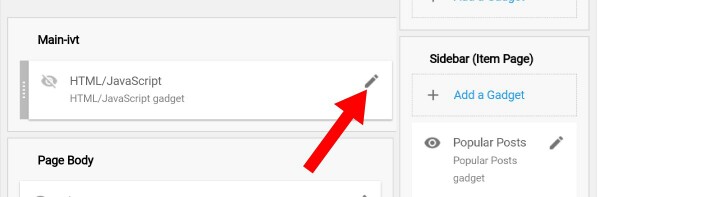
- Click on Layout from the Main Menu (left of your screen) on your Blogger Blog Dashboard
- On the screen that appears, locate the Main Ads Banner Widget. Then, click Edit. See the image below:
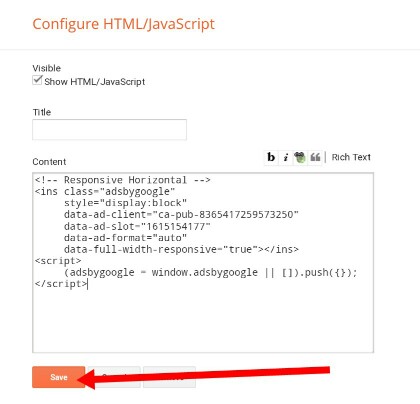
- On the pop up window, paste the AdsCode you earlier copied from your Google AdSense account.
- Now, click Save and refresh the Layout window.
- Done.


Option 2: to use image of your own as the banner ads
- I assume you are already logged into your blogger blog.
- Click the plus icon as seen in the image below. Clicking that will open a new post editor.
- Next, click the image upload icon as seen in the image below. Clicking that will pop out an upload wizard that allows you upload an image on blogger.
- Using the upload wizard above, upload the image you want to use for the banner ads and copy the image link as seen from the image below.
- Now, click on Layout from the Main Menu (left of your screen) on your Blogger Blog
- On the screen that appears, locate the Main Ads Banner Widget. Then, click Edit. See the image below:
- On the pop up window, simply replace or paste the Banner image url you earlier copied from above with the existing banner image url.
- Again, replace link (url) seen in the image below with the link (url) you want your image banner point or linked to.
- Now, click Save and refresh the Layout window.
- Done.
Questions and Answers:
Using the best methods known to us and in the simplest vocabularies we know of, we have presented these step by step tutorials. However, if there are some features you could not get to work or others you want us help you at, simply contact us from here so that we may provide answers to your every questions or assist you further.
Thank you for being such a wonderful customer!
No comments for "Docs Demo"
Post a Comment